Overview and What You Will Learn
In this guide you will learn the three main ways to release a new version of your application on Kubernetes without causing downtime. You will understand when to use each strategy, how to configure them in your deployment YAML, and how to verify they worked correctly. By the end you will be able to choose the right strategy for any production release situation.
Why This Matters in Production
Every time you push a new version of your application, users are at risk of seeing errors if the deployment is done carelessly. At companies like Swiggy or Razorpay, releasing code during peak hours without a safe strategy means thousands of users hitting errors or seeing a blank screen. The three strategies in this guide are how every serious engineering team ships code safely — one wrong configuration in your deployment spec and the entire rollout can take down your service.
Core Principles
There are three deployment strategies and each solves a different problem.
Detailed Step-by-Step Practical Lab
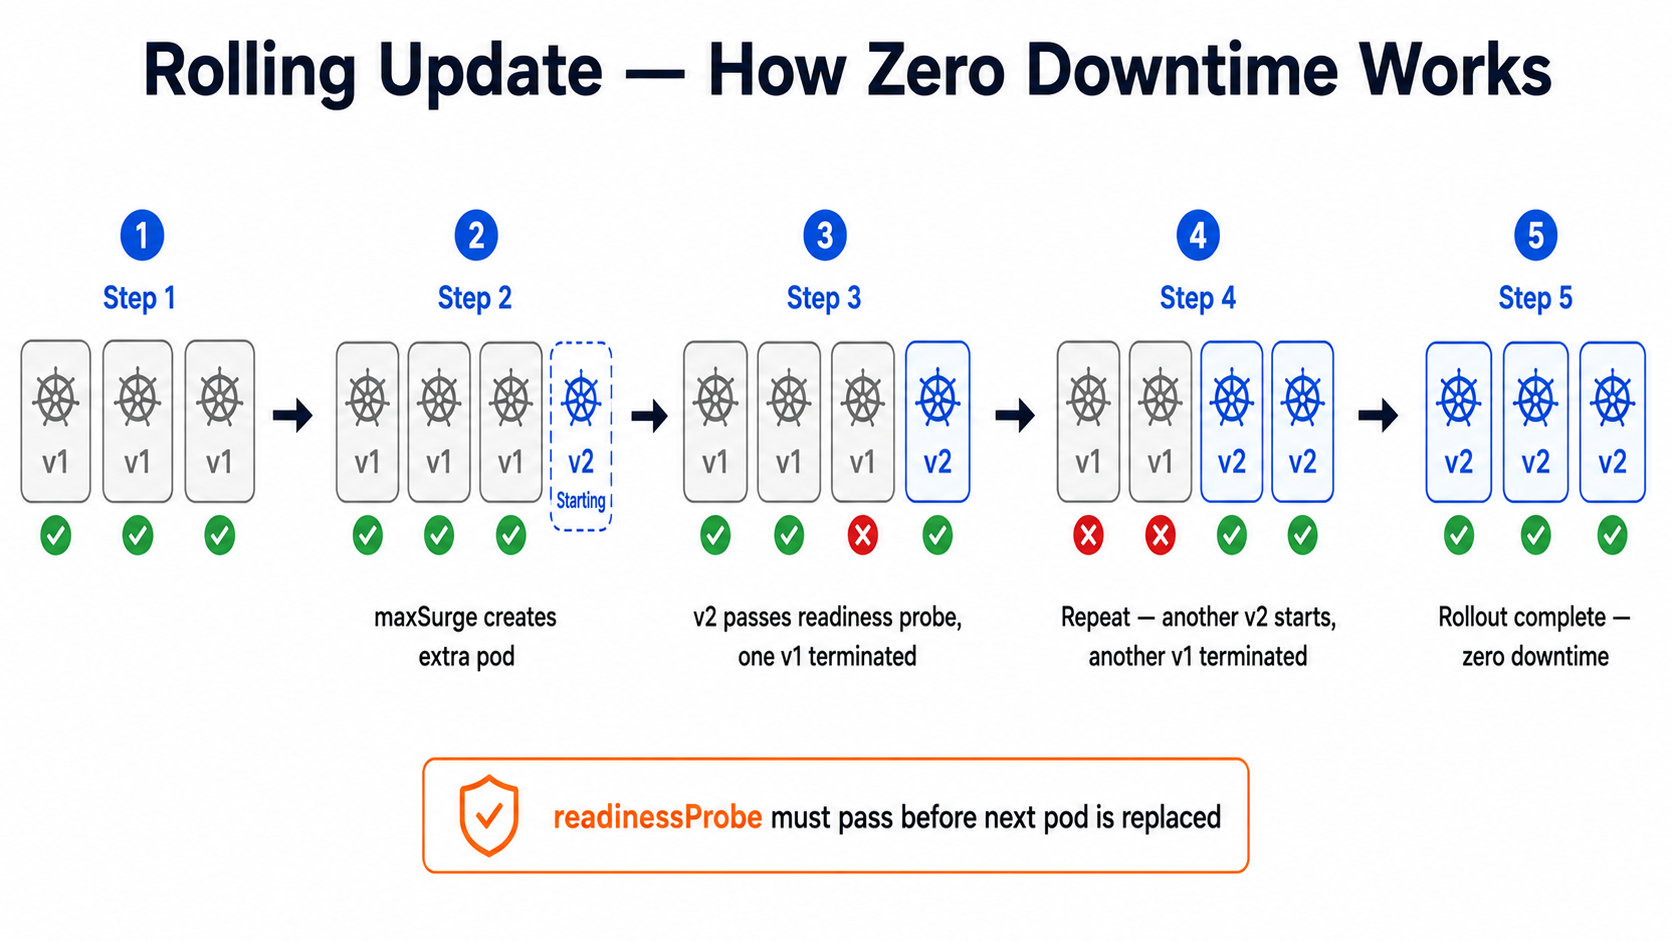
Step 1: Understanding Rolling Updates — The Default Strategy
Rolling update is what Kubernetes does automatically when you change an image. It replaces old pods with new ones gradually, making sure some pods are always running.
# deployment.yaml — rolling update configurationapiVersion: apps/v1kind: Deploymentmetadata: name: order-api namespace: productionspec: replicas: 6 strategy: type: RollingUpdate rollingUpdate: maxSurge: 2 # Create 2 extra pods during the update # So at peak you have 6 + 2 = 8 pods running maxUnavailable: 0 # Never reduce below 6 pods # This guarantees zero downtime selector: matchLabels: app: order-api template: metadata: labels: app: order-api version: v2.1.0 spec: containers: - name: order-api image: registry.swiggy.in/order-api:v2.1.0 readinessProbe: # CRITICAL — rolling update waits for this httpGet: # before moving to the next pod path: /health port: 8080 initialDelaySeconds: 10 periodSeconds: 5# Trigger a rolling update by changing the image tagkubectl set image deployment/order-api \ order-api=registry.swiggy.in/order-api:v2.2.0 \ -n production # Watch the rollout happen pod by podkubectl rollout status deployment/order-api -n production# Output: Waiting for deployment "order-api" rollout to finish...# Output: deployment "order-api" successfully rolled out # If something goes wrong — instant rollback to previous versionkubectl rollout undo deployment/order-api -n production # Check rollout historykubectl rollout history deployment/order-api -n productionREMEMBER THIS**Remember:** The `readinessProbe` is the most important part of a rolling update. Kubernetes only moves to the next pod after the new pod passes the readiness check. Without it, Kubernetes assumes the pod is ready immediately — and your users hit the new broken pod before it has finished starting up.
Step 2: Blue-Green Deployment — Full Instant Switch
Blue-green runs two complete environments side by side. Blue is live. Green is the new version. You test green thoroughly, then switch all traffic instantly by updating a Service selector.
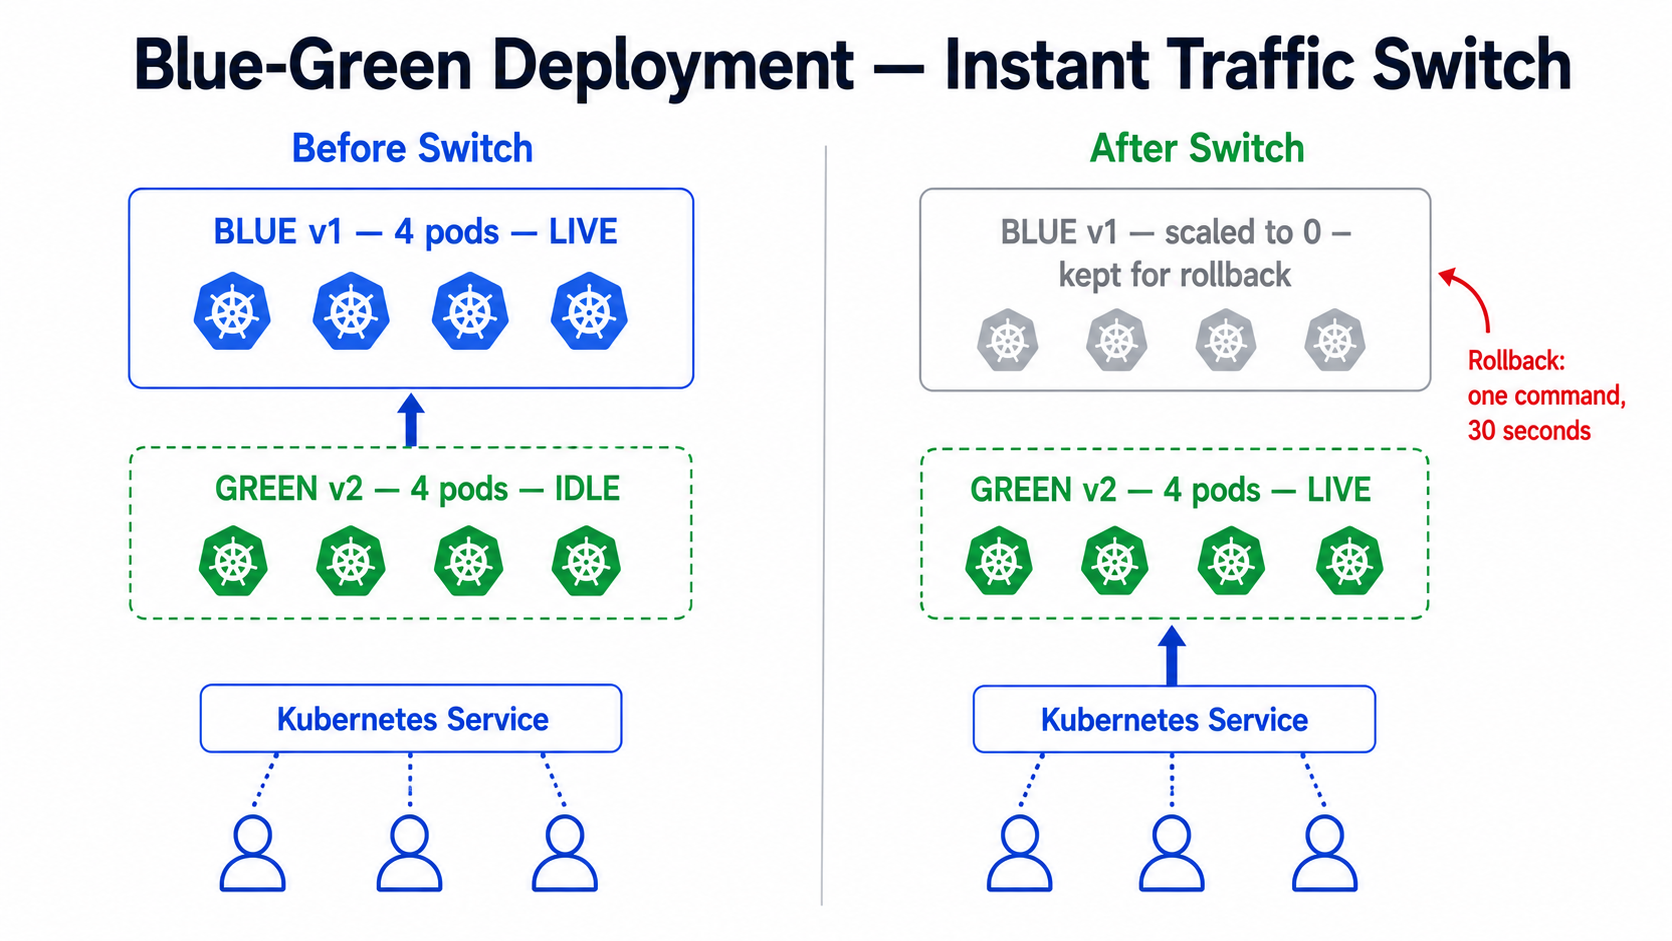
# blue-deployment.yaml — current live versionapiVersion: apps/v1kind: Deploymentmetadata: name: payment-api-blue namespace: productionspec: replicas: 4 selector: matchLabels: app: payment-api slot: blue # The key label that identifies this as blue template: metadata: labels: app: payment-api slot: blue version: v3.0.0 spec: containers: - name: payment-api image: registry.razorpay.in/payment-api:v3.0.0 ports: - containerPort: 8080# service.yaml — controls which slot receives live trafficapiVersion: v1kind: Servicemetadata: name: payment-api namespace: productionspec: selector: app: payment-api slot: blue # Currently pointing to blue — change to green to switch ports: - port: 80 targetPort: 8080# Step 1 — Deploy green and verify it is healthykubectl apply -f green-deployment.yamlkubectl get pods -n production -l slot=green# Wait until all green pods show Running 1/1 # Step 2 — Test green directly before switching traffickubectl port-forward deployment/payment-api-green 8081:8080 -n productioncurl http://localhost:8081/health# Confirm the new version responds correctly # Step 3 — Switch ALL traffic to green instantlykubectl patch service payment-api -n production \ -p '{"spec":{"selector":{"slot":"green"}}}' # Step 4 — Verify the switch workedkubectl describe service payment-api -n production | grep slot# Output: slot=green # Step 5 — If something goes wrong, switch back to blue in 2 secondskubectl patch service payment-api -n production \ -p '{"spec":{"selector":{"slot":"blue"}}}' # Step 6 — Once green is confirmed stable, scale down blue to save costskubectl scale deployment payment-api-blue --replicas=0 -n productionPLACEMENT PRO TIP**Tip:** Blue-green is the safest strategy for database schema changes. You can run the green version against the new schema while blue still runs against the old one. Once you verify green is healthy, switch traffic and then run the final migration. This is how Zerodha deploys changes to their trading engine during market hours.
Step 3: Canary Deployment — Gradual Traffic Splitting
Canary sends a small percentage of real users to the new version first. If it behaves well, you gradually increase that percentage. The simplest way to do canary in Kubernetes is by controlling replica counts.
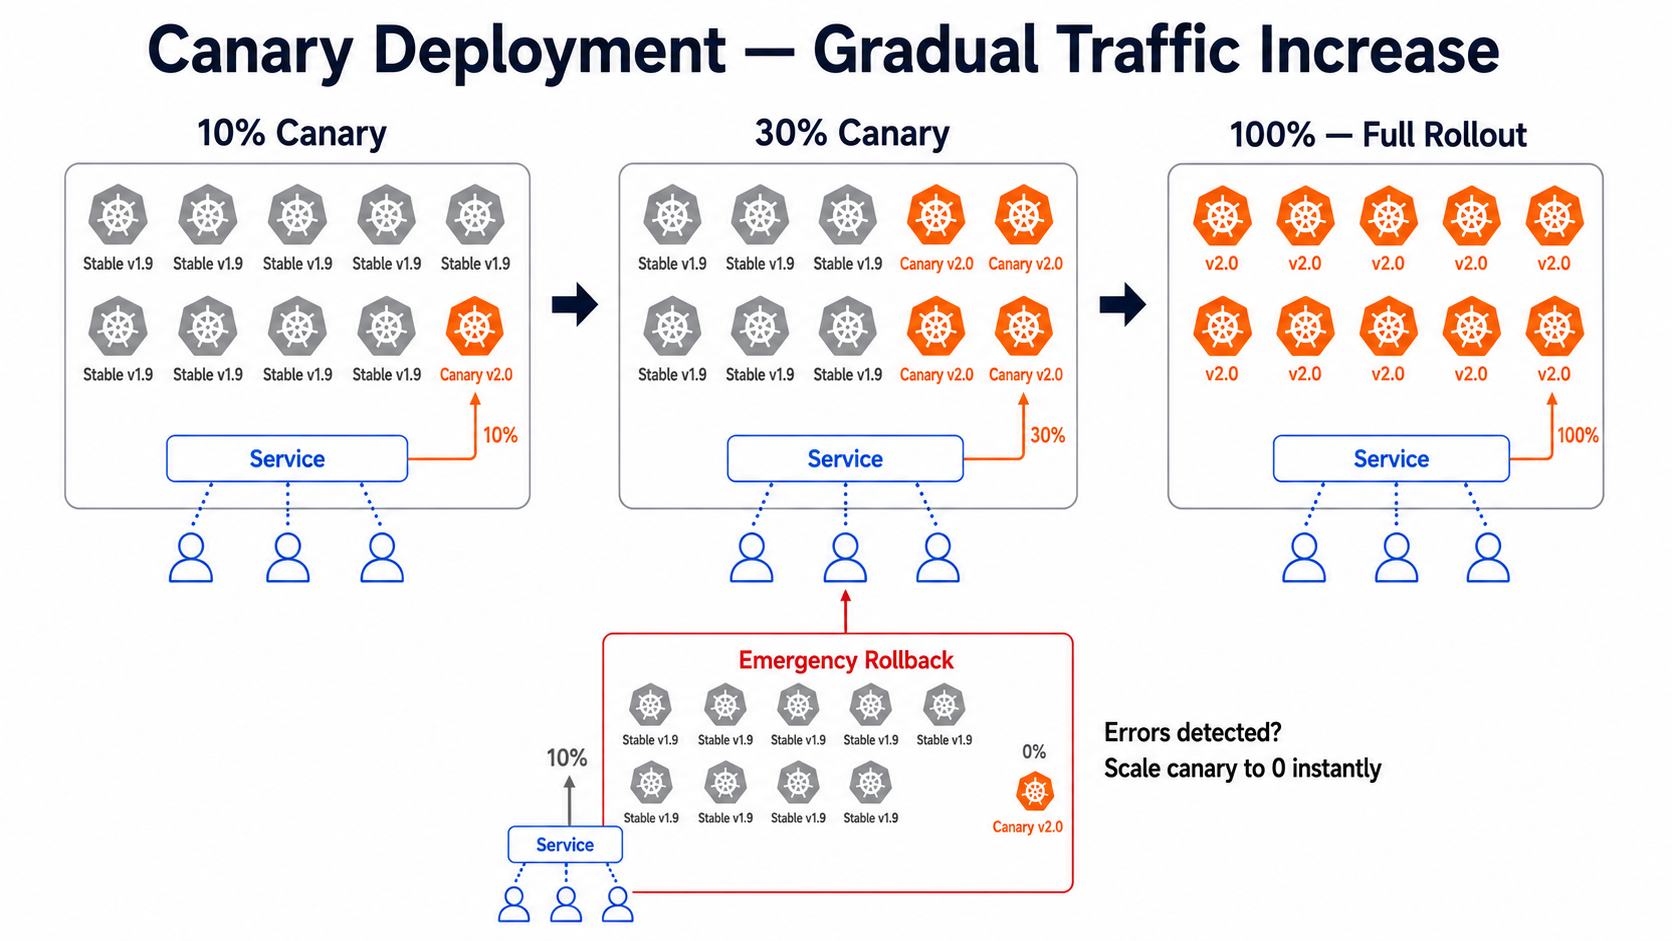
# canary-deployment.yaml — the new version, starts with 1 replicaapiVersion: apps/v1kind: Deploymentmetadata: name: notification-api-canary namespace: productionspec: replicas: 1 # 1 out of total 10 pods = 10% of traffic selector: matchLabels: app: notification-api track: canary template: metadata: labels: app: notification-api track: canary version: v2.0.0 spec: containers: - name: notification-api image: registry.hotstar.in/notification-api:v2.0.0 ports: - containerPort: 8080# stable-deployment.yaml — current version, 9 replicasapiVersion: apps/v1kind: Deploymentmetadata: name: notification-api-stable namespace: productionspec: replicas: 9 # 9 out of total 10 pods = 90% of traffic selector: matchLabels: app: notification-api track: stable template: metadata: labels: app: notification-api track: stable version: v1.9.0 spec: containers: - name: notification-api image: registry.hotstar.in/notification-api:v1.9.0# service.yaml — routes to BOTH deployments via shared app labelapiVersion: v1kind: Servicemetadata: name: notification-api namespace: productionspec: selector: app: notification-api # Matches BOTH stable and canary pods ports: - port: 80 targetPort: 8080# Monitor the canary version for errors in real timekubectl logs -l track=canary -n production -f # Check error rates on canary podskubectl top pods -l track=canary -n production # Gradually increase canary percentage# 10% -> 30%: scale canary to 3, stable to 7kubectl scale deployment notification-api-canary --replicas=3 -n productionkubectl scale deployment notification-api-stable --replicas=7 -n production # 30% -> 50%: scale canary to 5, stable to 5kubectl scale deployment notification-api-canary --replicas=5 -n productionkubectl scale deployment notification-api-stable --replicas=5 -n production # Full rollout: canary to 10, stable to 0kubectl scale deployment notification-api-canary --replicas=10 -n productionkubectl scale deployment notification-api-stable --replicas=0 -n production # If canary has problems — instant rollbackkubectl scale deployment notification-api-canary --replicas=0 -n productionkubectl scale deployment notification-api-stable --replicas=10 -n productionProduction Best Practices & Common Pitfalls
- Always define a
readinessProbeon every deployment. Without it, rolling updates route traffic to pods that have not finished starting up, causing errors for real users during every release. - For blue-green, always keep the old (blue) deployment scaled to zero — not deleted — for at least 24 hours after switching. If a critical bug is found the next morning, you can switch back instantly without redeploying.
- For canary, start with 5-10% of traffic and monitor for at least 15 minutes before increasing. Watch error rates, latency, and memory usage — not just whether the pod is running.
COMMON MISTAKE / WARNING**Common Mistake:** Using `maxUnavailable: 1` and `maxSurge: 0` in a rolling update. This means Kubernetes will kill one old pod before starting a new one — briefly reducing your capacity below the desired count. During a traffic spike this causes dropped requests. Always set `maxUnavailable: 0` for production deployments to guarantee full capacity throughout the rollout.
Quick Reference & Troubleshooting Commands
| Command | Purpose |
|---|---|
kubectl rollout status deployment/<name> |
Watch a rolling update in progress |
kubectl rollout undo deployment/<name> |
Rollback to previous version instantly |
kubectl rollout history deployment/<name> |
View all previous versions |
kubectl patch service <name> -p '{"spec":{"selector":{"slot":"green"}}}' |
Switch blue-green traffic |
kubectl scale deployment <name> --replicas=<n> |
Adjust canary traffic percentage |
kubectl rollout pause deployment/<name> |
Pause a rolling update mid-way |
kubectl rollout resume deployment/<name> |
Resume a paused rolling update |